Friday, July 31, 2009

Chocolate Cupcakes

I'd like to let you in on one vigorous quest I've embarked upon in the last few days. The quest to find a yummmy-licious chocolate cupcake recipe. A very very valuable and an important quest. The world is always a better place with more chocolate cupcakes.

In the span of two days, I baked three different types of chocolate cupcakes. One that used sour cream, one that used vegetable oil, and one that used butter. Once again, my electric hand mixer overworked itself but boy was this experiment fun. Excellent for my waistline.

As it happens on quests, I have learned many valuable lessons about myself and cupcakes. For one, my doubts about veggie oil in baking have been overthrown. I know that for veteran bakers this is more than obvious information but for me, this was a great relief. Veggie oil works. Two, it isn't only lasagna that tastes better the next day. Despite the numerous disclaimers that say that the cupcakes taste best the day they're baked, I've found that every cupcake that I've baked tasted better the next day. Third thing I learned is that I'm a bit of an arrogant baker. Considering the fact that I've only just started baking, I take wayyyy too many liberties with the ingredients. The sour cream cupcakes probably didn't taste right because I made too many changes. Lesson learned. Add 'humility' to my next quest.

A quest for an important recipe is not complete without 'quality' judges. So I gathered a panel of highly qualified judges to present my bakings. (These people are skilled eaters and have been eating their entire lives.) The verdict was this: the butter cupcakes were totally 'rockin' but were overshadowed by the veggie oil cupcakes which were deemed 'amazing' by the panel.

Anyhoo,
Here are some pix for your amusement.


As you can see, I'm very skilled at frosting cupcakes.
If you need any badly iced cupcakes, please. Give me a buzz.


So I present to you Veggie Oil Cupcakes

Official Name: Black Magic Cake
from the Hershey's site


Ingredients:
  • 2 C sugar
  • 1 3/4 C all-purpose flour
  • 3/4C Hershey's Cocoa
  • 2 tsp baking soda
  • 1 tsp baking powder
  • 1 tsp salt
  • 2 eggs
  • 1 C buttermilk or sour milk
  • 1 C strong black coffee or 2 tsp powdered instant coffee plus 1 C boiling water
  • 1/2 C vegetable oil
  • 1 tsp vanilla extract
  • **I added about 2/3 C of chocolate morsels to the batter (folded them in at the end) but they all sank to the bottom of the cupcakes. It still tasted good and my judges loved picking them off the paper cups.
Directions:
  1. Heat oven to 350 degrees F. Grease and flour muffin pans
  2. Stir together sugar, flour, cocoa, baking soda, baking powder and salt in large bowl. Add eggs, buttermilk, coffee, oil and vanilla; beat on medium speed of mixer 2 minutes (batter will be very thin). Pour batter into pans.
  3. Bake for 22-25 minutes or until wooden pick inserted in the center comes out clean.
  4. Cool and frost as desired.
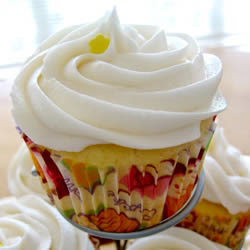
I used vanilla whipped cream to ice the cupcakes which people LOVED. They look amazing together, too.

Vanilla Whipped Cream
  1. Beat 2 cups of heavy cream (fresh cream) in a chilled bowl until it thickens.
  2. Add 3/4 cups of icing sugar (confectioners sugar) gradually as you continue to beat the cream.
  3. Add 2 teaspoons of pure vanilla essence and keep beating until soft peaks form.
  4. After you frost the cupcakes, if you're not eating them right away, make sure you keep the in the refrigerator as the cream will soften up and lose its form.

(Butter) Chocolate Cupcakesswiped from Joy of Baking (A genius site for baking and presented with very kind and detailed instructions)

Ingredients

  • 1/2 cup dutch-process cocoa owder
  • 1C boiling hot water
  • 1 1/3 C all purpose flour
  • 2 tsp baking powder
  • 1/2 C unsalted butter, room temp
  • 1 C granulated white sugar
  • 2 large eggs
  • 2 tsp pure vanilla extract
Frosting
  • 4 oz unsweetened chocolate, coarsely chopped
  • 2/3 C unsalted butter, room temp
  • 1 1/3 confectioners sugar, sifted
  • 1 1/2 tsp pure vanilla extract
Cupcakes
  1. Preheat oven to 375 degrees F. Line muffin cups with paper liners or butter them
  2. In a small bowl stir until smooth, the boiling water and cocoa powder. Let cool to room temp.
  3. In another bowl, whisk together flour, baking powder, and salt.
  4. In a bowl of electric mixer or hand mixer, cream butter, sugar until light and fluffy. Add eggs one at a time beating until smooth. beat in vanilla. Add flour mixture and beat only until incorporated. Then add cooled cocoa mixture and stir until smooth.
  5. Fill muffin cups two-thirds with batter and bake for 16-20 minutes or until risen, springy to the touch, and a toothpick inserted into cupcake comes out clean. Frost when the cupcakes have cooled.
  6. Makes about 12 cupcakes (I came out with 15)
Frosting
  1. Melt chocolate in a heatproof bowl placed over a saucepan of simmering water. Remove from heat and let cool to room temp.
  2. In the bowl of your electric mixer, or with a handmixer, beat the butter until smooth and creamy (about 1 min). Add the sugar and beat until light and fluffy (about 2 min). Beat in vanilla extract. Add the chocolate and beat on low speed until incorporated. Increase the speed to medium-high and beat until frosting is smooth and glossy (about 2-3 minutes)
Life is great when you can have this much fun with cupcakes and chocolate. :)
Enjoy. Enjoy. Enjoy.

Saturday, July 25, 2009

Honey Lemon Cookies


When I see 'lemon' in a recipe, I think delicate, sunny, light, sweet. And I needed some of those with my horrible sinus infection and the fickle fickle New Zealand weather. (C'mon! Make up your mind, already! Four seasons in one day - totally confusing!)

These cookies are closer to cake, like madeleines. They're very soft and subtle. And these aren't one of those cookies that would dazzle you at first bite (or sight). Rather, these will subtly grow on you like....your new jeans you have to wear a few times until you declare it your favourite......Just this morning, I, inadvertantly, ate four cookies in one sitting. Oooops!

The original recipe calls for sugar icing but I coated the cookies with chocolate ganache, instead. I had some cream that I needed to use up. The ganache, I liked very much. :) (Although, they are fantastic on their own, too)


Honey Lemon Cookies
From Allrecipes.com

Ingredients:
  • 7 Tbsp butter, softened (about 98g)
  • 1/2 C sugar
  • 1 egg
  • 1 3/4 C all-purpose flour
  • 1 tsp baking powder
  • 1/2 tsp salt
  • 1/3 C honey
  • 1/4 C plain yogurt (I used sour cream because it's what I had)
  • 2 tsp grated lemon peel
  • 1/2 tsp lemon extract (I used 2 Tbsp of lemon juice because, again, it's what I had)
  • ICING
  • 1 C confectioners' sugar
  • 2 Tbsp lemon juice
  • 2 tsp grated lemon peel
What you do
  1. Pre-heat oven to 350 degrees F
  2. In a small mixing bowl, cream butter and sugar. Beat in egg. Combine flour, baking powder and salt. Combine honey, yogurt, lemon peel and lemon extract. Add dry ingredients to cream mixture alternately with honey mixture.
  3. Drop by tablsponfuls 2 inches aprt onto greased baking sheets. Bake at 350 degrees F for 10-12 minutes or until golden brown. Remove to wire racks.
  4. In a small bowl, combine the confectioners' sugar and lemon juice until smooth. Brush over the warm cookies; sprinkle with lemon peel.

Chocolate Ganache (I made very little ganache, so you may want to double this recipe if you want to coat all of your cookies)
  1. In medium-high heat cook 1/4 C of thickened cream to boil in a saucepan.
  2. When the cream comes to boil and is smooth, turn the heat off and pour 100g of bittersweet dark chocolate chips into the saucepan and sir until all is smooth. Remove from heat and cool for about 30 minutes or until ganache is lukewarm.
  3. When the cookies have cooled, spoon 1-2 tablespoons of ganache over cookies that are on a tray with parchment paper.
  4. Refrigerate cookies until the ganache sets.

Friday, July 24, 2009

No Sugar Dark Chocolate


I had a craving for the movie 'Prime' today. And so, I went into my kitchen searching for a sweet snack to accompany my movie. I settled for Richfield's 'no sugar' dark chocolate that I'd bought for baking. These were a new entity to me. On principle, I ignore all no sugar treats in the supermarket. If I'm snacking, I'm snacking for the sugar. But this was also a trust issue. I have great faith in Richfield's chocolates as they have never failed me...yet. And I'm glad I took the risk as these chocolates were exquisite. The absence of sugar gave room for the chocolate flavor to be more pronounced. I like to steer away from overused expressions that have lost its effect but I must stoop down today because there's no other way to say that these 'melt in your mouth.' And if you're looking for a 'melt in your mouth' movie, try out 'Prime.'


Wednesday, July 22, 2009

Okonomiyaki


(A redo of Okonomiyaki blog entry)
I heard on one of the ted.com 'talks' that human beings are the only animal who can actually simulate experiences that hasn't happened yet - one of the reasons why we don't have a real 'mud' cake. It's because we can simulate the nasty taste without having to actually experience it. Something to do with the frontal lobe or whatever. :-P Anyhoo, as the theory of the frontal lobe goes, I was able to simulate the outcome of this recipe and knew I'd like this very much. And they tasted better than the simulation in my head, too. :)

Here's the recipe. You can be very creative with the recipe. They can probably be served in a hundred different ways. I've seen these sprinkled with chives, almonds, mayonnaise and thousand island.

Okonomiyaki (Japanese Pizza)
(Nicked recipe from 101 cookbooks)
  • 2C cabbage, finely shredded
  • 1C leeks, well washed and chopped (My GOODNESS, these were huge!!!! If I were a spring onion, I'd be soooooo intimidated by leeks.)
  • 2/3 C whole wheat pastry flour (or apf flour) - I used "Korea pancake mix flour" - different from a regular pancake mix. This mix is used for Korean veggie pancakes (e.g. kimchi, chives etc). I used this cuz I reeeeallly love these Korean pancakes and the taste of this flour.)
  • A couple of pinches of fine grain sea salt
  • 2 eggs, beaten
  • 1+ Tbsp olive oil
  • Garnish: toasted silvered almonds, chives/herbs
Here's what you do:
  1. Combine the cabbage, leeks flour, and salt in a bowl. Toss until everything is coated with a dusting of flour. Stir in the eggs and mix until everything is evenly coated.
  2. Heat a large skillet over medium heat and add a generous splash of olive oil.
  3. Scoop the cabbage mixture into the pan, and using a metal spatula press it into a round pancake shape, flat as you can get it. Cook for 4-5 minutes, or until the bottom is golden.
  4. To flip, the okonomiyaki, slide it out of the skillet onto a plate. Place another plat on top and flip both (together) over. If you need a bit more oil in your skillet, add it now, before sliding the okonomiyaki back into the skillet.
  5. again press down a bit with a spatula and cook until golden on this side - another 3-5 minutes.
  6. When you are finished cooking, sprinkle with toasted almonds and chives, and slide it onto a cutting board to cut into wedges. Enjoy immediately.
  7. Serves 1-2

Honey, I Shrunk the Kids Cookies


(A redo of Honey I Shrunk the Kids Cookie blog entry)
Remember the scene in 'Honey, I Shrunk the Kids' when the shrunken kids come across an oreo cookie in the backyard? These cookies look exactly like that cookie. Exactly.

I worked really hard with these cookies. Like really hard.
I used an electric hand mixer for all the food-processing steps and oh boy oh boy oh boy..it made up for not going to the gym. Definitely need to get me one of those food processors.

And. That damned cream. That damned cream just would not cream so I stood in my tiny little kitchen with my arm around my mixing bowl and the other hand trying to control the electric hand mixer to stay at an angle to keep my crumbly cream from going everywhere - which it did. I've got splashes of the cookie and cream mixes all over my kitchen walls. Nice.

I made these last night. With all that hard work, I had 'great expectations' for these cookies. I was pleased with the appearance - very 'Honey I shrunk the kids.' I wasn't so sure about how they tasted, though. But today, I think they actually taste a lot better than last night. I might do a rerun of these cookies..probably after I purchase a proper food processor. (Also, if I can find some proper vegetable shortening. I used 'shredded' shortening - have no idea if there's a big difference. I used this shortening cuz I couldn't find any other kind of shortening. Am I not looking hard enough or do New Zealanders not use veggie shortening?)

Anyhoo...
Here's the recipe from Smitten Kitchen.
Makes 25 to 30 sandwich cookies
For the chocolate wafers:
1 1/4 cups all-purpose flour
1/2 cup unsweetened Dutch process cocoa
1 teaspoon baking soda
1/4 teaspoon baking powder
1/4 teaspoon salt
1 to 1 1/2 cups sugar [see recipe note]
1/2 cup plus 2 tablespoons (1 1/4 sticks) room-temperature, unsalted butter
1 large egg
For the filling:
1/4 cup (1/2 stick) room-temperature, unsalted butter
1/4 cup vegetable shortening
2 cups sifted confectioners’ sugar
2 teaspoons vanilla extract
  1. Set two racks in the middle of the oven. Preheat to 375°F.
  2. In a food processor, or bowl of an electric mixer, thoroughly mix the flour, cocoa, baking soda and powder, salt, and sugar. While pulsing, or on low speed, add the butter, and then the egg. Continue processing or mixing until dough comes together in a mass.
  3. Take rounded teaspoons of batter and place on a parchment paper-lined baking sheet approximately two inches apart. With moistened hands, slightly flatten the dough. Bake for 9 minutes, rotating once for even baking. Set baking sheets on a rack to cool.
  4. To make the cream, place butter and shortening in a mixing bowl, and at low speed, gradually beat in the sugar and vanilla. Turn the mixer on high and beat for 2 to 3 minutes until filling is light and fluffy.
  5. To assemble the cookies, in a pastry bag with a 1/2 inch, round tip, pipe teaspoon-size blobs of cream into the center of one cookie. Place another cookie, equal in size to the first, on top of the cream. Lightly press, to work the filling evenly to the outsides of the cookie. Continue this process until all the cookies have been sandwiched with cream. Dunk generously in a large glass of milk.
I'd like to dedicate these cookies to my electric hand mixer who worked really hard with me. Well done mixer. Well done.

Friday, July 17, 2009

Chocolate Crinkles - to make the world a better place


Have you seen this movie? It's one of my favourites. It's definitely a unique movie that has ejected itself from the mainstream of Hollywood movies. It's got wit, charm, heart. I especially love the fact that the movie features writers and bakers. :)
In the movie, Will Ferrell meets a quirky baker, Maggie Gyllenhaal. And, of course, they meet to fall in love. (What other reason could there be??) Will Ferrell asks the quirky baker how she came to be baker and she replies that she initially wanted to be a lawyer to make the world a better place but dropped out of law school to become a baker. She figured that she would make the world a better place with cookies instead of with law as the latter wasn't working out for her. Isn't that great? Isn't that what all of us should strive to do with what we do, whether we end up where we planned to be or not? To make the world a better place - by baking, waitressing, or dog-walking, if we all did what we do with this mindset, we can totally improve the world, right?

So here's my contribution to healing the world and making a better place - Chocolate Crinkles. Yeah~I have nick-named these 'brownie cookies' - if you love brownies you cannot not love these little babies.


Chocolate Crinkles
adaptd from Joy of Baking (Stephanie Jaworski) -> Have you been to this site? It's totally amazing! I'll probably end up downloading all of the recipes on this site!!!

You need:
  • 4 Tbsp (56g) unsalted butter
  • 8oz (225g) semisweet or bittersweet chocolate, coarsely chopped
  • 1/2 C (100g) granulated white sugar
  • 2 large eggs
  • 2 tsp pure vanilla extract
  • 1 1/2 C (210g) all-purpose flour
  • 1/4 tsp salt
  • 1/2 tsp baking powder
  • Topping: 1 C (110g) confectioners sugar, sifted
  • I didn't have enough chocolate to melt so I added 2 Tbsp of cocoa powder - I did see another Chocolate Crinkle recipe that added cocoa powder.
  1. In a stainless steel bowl, over a saucepan of simmering water, melt the chocolate and butter. Remove from heat and set aside
  2. In the bowl of an electric mixer, beat the eggs and sugar until thick, pale, and fluffy. (When you slowly raise the beaters the batter will fall back into the bowl in slow ribbons.) At this point beat in the vanilla extract and then stir in the melted chocolate mixture.
  3. In a separate bowl whisk together the flour, salt, baking powder. Add dry ingredients to the chocolate mixture, stirring just until incorporated. Cover with plastic wrap and refrigerate until firm enough to shape into balls (3-4hrs or overnight)
  4. Preheat oven to 325 d F (170 d C) and place rack in the center of oven. Line two baking sheets with parchment paper.
  5. Place the confectioners sugar in a shallow bowl. With lightly greased hands, roll a small amount of chilled dough to form a 1 inch diameter ball. Place the ball of dough into the confectioners sugar and roll the ball in the sugar until it is completely coated and no chocolate shows through. Gently lift the sugar-covered ball, tapping off excess sugar, and place on prepared baking sheet. Place the cookies 2 inches apart. (If you find the dough getting too soft for rolling into balls, return to the refrigerator and let chil until firm) I was a little impatient (I wanted the cookies NOW) so I stuck the dough in the freezer for 30 minutes. The dough was very flaky so I took the amount I needed for a cookie and squeezed them a few times with my hands like I was playing with a playdough and it was quite easy to mold.
  6. Bake cookies for 8-10 minutes or just until the edges are slightly firm but the centers are still soft. (For moist chewy cookies do not over bake. Over baking will give you dry cookies) Leave on the pan until the cookies are set. Place on a wire rack to cool.
  7. Makes about 3 dozen.
P.S. - I had my first baking burn today. I burned my index finger and thumb. Now, I'm a real baker..right?

Tuesday, July 7, 2009

Tuna Kimbap (Korean Sushi)


I discovered David Lobovitz yesterday. Apparently a big name in the food blogging world and on the blog roll of many of my favourite blogs so I took a gander at his blog and discovered that he loves Korean food. That did it for me. Now he is on my blog roll.

Anyway, on to the 'fooooooood.' I love baked goods but when it comes to the main meals, I veer towards Asian. So, here's a great Korean recipe for Tuna Kimbap (Korean for sushi).
This is the lunch I made along with the lemon cupcakes. (A very sensible food combo. I know~) Just a note - this is not your traditional Korean kimbap. I guess this is classic 'fusion food.'

Recipe from Maangchi.com (here's a video of this recipe by Maangchi herself!)

You need:
  • Sushi rolling bamboo mat
  • 5-6 cups of cooked rice (made from 3 cups of uncooked rice)
  • laver ("kim" aka the seaweed stuff)
  • yellow radish pickle ("danmu ji" in Korean - can get it at almost any Korean stores)
  • 1 avocado - skinned and chopped into long strips
  • 1 C crabmeat
  • can of tuna (in water or oil)
  • 1/4 C of sesame oil for glazing
  • For the tuna: 1 Tbsp soy sauce, 1 tsp ground black pepper, 1 tsp minced garlic, 1 1/2 Tbsp sesame oil, 1 Tbsp sesame seeds, 1 green onions chopped up into little bits
  • For the rice: 1/2 Tbsp sugar, 1 tsp salt, 1 Tbsp white vinegar
Rice
*Traditionally, Kimbap rice, unlike sushi rice, is served plain . This is because the contents in Kimbap are very well seasoned. But somewhere along the way, people started to season Kimbap rice. Tse!
  1. Put the cooked rice in a large bowl
  2. Make your mixing sauce by mixing up the sugar, salt, and vinegar. Mix until the liquid looks clear (I used sushi vinegar which was fine)
  3. Mix the mixing sauce with rice and stir it evenly.
Tuna
  1. Drain the canned tuna.
  2. Put the tuna on a heated pan and drizzle about 1 Tbsp of sesame oil over it. Toss it and cook it for 2 minutes.
  3. Add soy sauce, sugar, garlic, and black pepper. Cook for another 3 minutes while stirring.
  4. Remve from heat. Add green onions, the remaining sesame oil, and sesame seeds.
  5. This should be very flaky.
Rolling Kimbap
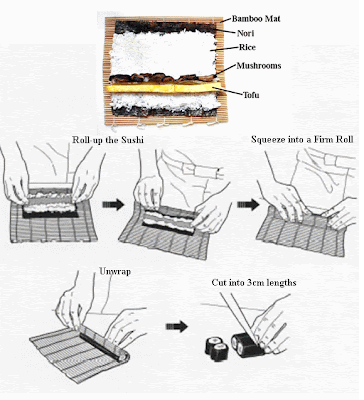
  1. Place a sheet of laver ("kim") on the bamboo mat and evenly spread a layer of rice in the centre. (Refer to the illustration - my pic of unrolled kimbap may not be helpful...still learning here.)
  2. Place 2-3 spoons of seasoned tuna flakes on top of the layer of rice in a strip. Add radish, avocado, and crap meet in the same way on top of each other.
  3. Roll it up using the bamboo mat. Glaze the Kimbap roll with some sesame oil. You can use your hand or a brush for this.
  4. Cut the roll into 2-cm pieces.
*Tip: Have a wet cloth to wipe the knife while cutting. This makes it easier to cut the kimbap rolls.

Trust me. These are very yummy. You'll be the hit of the international potluck party. :D

Monday, July 6, 2009

S'mores Brownies


So, here's another great concoction by one of my favourite baker bloggers "Joy the Baker" S'mores Brownies. S'mores is American. And luckily I've actually had an authentic s'mores in America with American marshmallows cooked on an American campfire. So. I deem myself totally qualified to make this divine creation.

I have to say, I was so, so, sooooooo excited to be making this. This is my second recipe tried from Joy the Baker.

  • 1 1/2 C all-purpose flour
  • 2 tsp baking powder
  • 1 tsp salt
  • 1 C unsalted butter
  • 6 oz unsweetened chocolate, chopped (I used bittersweet Whittaker chocolate - a very wonderful NZ brand)
  • 5 large eggs
  • 1 1/4 C dark brown sugar (I couldn't find 'dark' brown sugar so I used regular brown sugar...how dark are these anyway??)
  • 1 C granulated sugar
  • 2 tsp vanilla essence
  • 1 C graham cracker, roughly crushed with your hands (I used Digestives as Kiwis don't eat graham crackers. I personally prefer Digestives over graham crackers for regular snacking, although, they are virtually the same kind of crackers)
  • 12 big marshmallows (Joy the Baker says she diced 6 additional marshmallows and stirred them into the batter and that these dissolve when baked. I didn't use these. I thought the batter was sweet enough as it is)
  • (I chopped up about 2 oz of chocolate and folded them in with the graham crackers because I like chocolate in brownies and also I'd bought an 8 oz chocolate bar, which means I had 2 oz left after melting the required 6 oz. :-P)
  1. Preheat oven to 350 degrees F. Butter 9x13 inch baking pan with 2 inch sides. (butter bottom and sides with a brush) Combine the first 3 ingredients in a small bowl. Stire butter and chocolate in medium sized bowl over a heavy saucepan of simmering water. Stire chocolate and butter in this double boiler until melted and smooth.
  2. Beat eggs, sugar and vanilla in large bowl to blend. Stir in warm chocolate mixture, then dry ingredients. Fold in graham crackers. Pour batter into prepared pan. Dot with 12 large marshmallows. Bake until toothpick inserted into center comes out with moist crumbs attached, about 30-40 minutes.
  3. Marshmallows will be browned and puffy but will deflate as the brownies cool. Cool for at least 20 minutes then slice with sharp knife, cleaning the knife with hot water if it gets too messy and sticky.
My entire house smells of brownies right now. I just cut them up and put'em in a container. It was so hard not to take a bite while doing this. Mmmmmm~~!! :)
The brownie was surprisingly not as sweet as I imagined. I mean, check out the sugar content! But the crackers were very plain so I think that balanced it out. I was really looking forward to a crispy bite of the crackers but they became like bread once baked. The marshmallows: Kiwi marshmallows are very different from the American ones so I was a little apprehensive about these but these added the unique flavour and fun to the brownies. I liked them. (edit: These are actually superbly sweet. A couple of glasses of milk should be in session when you're indulging in them.)

Friday, July 3, 2009

Flourless Peanut Butter Cookies


Joy the Baker has become one of my favourite blogs to visit. Not only does she concoct unique and yummy looking recipes, she's a discreetly talented & funny writer. Just yesterday, I came across this flourless peanut butter cookie recipe on her blog and was itching to try them out. I also had a jar of peanut butter that I had since last December and this was about to expire. So, it was the perfect recipe.

Here it is:
1 C all-natural chunky or smooth peanut butter
1C sugar (1/2 brown sugar, 1/2 granulate sugar) - I used 1/3 of each, ending up with 2/3 of sugar
1 egg
1 tsp baking soda

Preheat oven to 350 degrees F (about 180 degrees C). Grease a baking sheet with butter and set aside. In a mixer combine peanut butter and sugars until well combined, mix for about 2 min. Add egg and baking soda and mix for another 2 min. Roll into walnut sized balls and create a criss-cross pattern with a fork. Remember to leave room between the cookie drops because they spread. As you can see in the picture, I forgot to do that!

If you'd like, add a few chocolate pieces to the top of the cookies. (I added the wrong kind of chocolate and they didn't melt!!! - as you can see in the picture. :P) Bake for 10 minutes until lightly browned (My oven took 15 minutes). When they're right out of the oven, they will look bloated and will feel too soft. It will calm down and harden as it cools. Cool on baking sheet before enjoying them.

The cookies would do better with the name biscuits. They were cripy, airy, and very, very light. I personally prefer dense, chewier cookies but I'm sure these will grow on me. I still gobbled down two cookies. :D

(21 July) I now realise that the choclates need to be smeared with a spoon or a knife after it's been baked. ah..........

"Real" Honey Lemon Tea


(I've never been embarrassed by my photography skills. I rate myself an average photographer and I think I generally take acceptable and occasionally fabulous pictures. But I am embarrassed about this one and I do apologise for the very blurry picture.)

Anyhoo, the point is that I have found the best way to make honey lemon tea --> It is to squeeze real lemon! I may be the last person on the planet to have discovered this but I don't care. I've been sniffing and sneezing with a very sore throat in the last week and these saved my life. I believe them to be superior to Lemsip and any other flu remedy out there.
So in more recipe-like language, this is what I did. First, I squeezed a lemon into a mug. (my lemon was the size of an egg) Then I poured hot water (or just regular black tea or your fave tea would work here) into the mug followed by honey. Then I happily stirred with great anticipation. Finally, sip sip~

I bought a bunch of lemons for cupcake baking and had a lot left and was thinking about what else I could make with lemons besides cupcakes. Honey Lemon Teaaaaaa .... mmmmmmmmmmm

Thursday, July 2, 2009

Old Fashioned Recipe Books: Scrapping!


When I tell people that I started baking, they think that I probably have my laptop in the kitchen when I'm baking. But that is not true. I am an old-fashioned girl. I re-type (or copy/paste) my recipe on my awesome "Print Shop 2," make it pretty with pictures, print them out, and glue them into my recipe scrapbooks. :)

I've got two cupcake/dessert recipe books and one non-dessert recipe book. I cannot wait to try all of these recipes!!!

Please invite me to a potluck!

Lemon Cream Cupcake Recipe


Last Sunday, we were introduced to a missionary who had just lost his wife and thus had to come back to New Zealand. He was having the funeral at our church today and we (the congregation) received an email for help - for baked goods for their afternoon tea. I, very happily and respectfully, volunteered and planned to make cupcakes for this occasion.

I absolutely loved my first lemon cupcakes but came across this other lemon cupcake recipe that was getting rave reviews. So, I decided to venture out and bake this one.

With frosting, I also decided try something I haven't before - Dark Chocolate Ganache. This was another interesting experience.

Here's the recipe - adapted from "Hometown Cooking"

Cupcake Ingredients:
  • 3 1/2 C all-purpose flour/cake flour (I used this)
  • 2 tsp baking powder
  • 1 tsp baking soda
  • 1/2 tsp salt
  • 1 C (226g) butter softened and at room temp
  • 1 1/2 C granulated sugar
  • 2 tsp vanilla extract (I used 1 tsp only)
  • 3 eggs
  • 8 oz (226g) dairy sour cream
  • 2 tsp lemon zest
  • (I also added 2 Tbsp lemon juice just because I wanted to taste the lemon more strongly)
Dark Chocolate Ganache Ingredients
  • 1 C thickened cream
  • 400g bittersweet dark chocolate
Cupcakes
  • Preheat oven to 180 degrees C. Line cupcake pans with paper cups.
  • Combine flour, baking powder + soda, and salt. Set aside.
  • In a large bowl, beat butter with a mixer then add sugar and vanilla. Beat until well mixed.
  • Add eggs, one at a time, beating well after each addition. Add flour mixture and sour cream (and lemon juice if you're adding it) alternately to beaten mixture, beating on low speed after each addition is just combined. (Do not overmix!) Stir in lemon peel. The batter will be very thick)
  • Spoon about 1/4 cup of the batter into each cup. Bake about 18 minutes or until a wooden toothpick inserted in centre comes out clean.
Dark Chocolate Ganache
  • Break chocolate into small pieces and put in a small bowl.
  • Put the crea into a saucepan and bring to boil.
  • Pour cream over chocolate and stir until chocolate has melted.
The cupcakes were not as light and fluffy as my other lemon cupcakes. It also lacked a lot of lemony flavour. It was still light and fluffy but more dense and very soft. The texture was definitely completely different. Also, my lemon cupcakes had a very buttery aftertaste but with this cupcake, I could not taste the butter as strongly. I know which one I personally prefer but I think it comes down to preference.

The Chocolate Ganache - now I know that I need to use fresh cream (heavy whipping cream) rather than the thickened cream (and most Ganache recipes call for heavy cream unlike this recipe). The thickened cream was so thick that the frosting started hardening a lot faster than I was ready for - I could not use my piping tube! I also ended up having bits of unmelted chocolate in my frosting.. :(
I've seen other Ganache recipes using butter (probably about 2-3 table spoons - melted in with the cream) but I opted not to do that. Other than the mistake of using thickened cream this is a great chocolate frosting. It's pure chocolate unlike 'chocolate butter cream frosting' and the like.

A little story. I had to drop these off in the morning before work so the frosting was made in the morning but the cupcakes were made last night. I was in the middle of prepping my ingredients to bake the cupcakes and as I was spooning my butter, I realised I didn't have enough. I had all my ingredients laid out (eggs cracked and everything) and was short of butter. I had a tub of shortening but could not bring myself to use it so, I stopped, left all my ingredients out in the open, drove out to a supermarket and bought the butter, came back and continued baking. :D Ahhhh the joy of living with my anal-retentive self. :)

I was disappointed I could not use my new piping tube but I know I'll get to use it in the very near future...hopefully... :)

Wednesday, July 1, 2009

Night Baking....


Right now, I am waiting for my cupcakes to cool. The above cupcake was what I was baking...I didn't read the recipe very carefully and didn't realise that they would rise a lot more than my other cupcake recipes...so they look like muffins... :( I'm a cupcake person NOT a muffin person...will compensate with beautiful icing tomorrow morning.